About Me

My photo
A young and slightly ignorant woman who has always loved baking and cooking, I want to make people happy with food as often as I can. I'm here to whisk away and explore!
Showing posts with label recipe. Show all posts

Thursday, October 10, 2013

Not Dead Yet! Ginger Snaps with Cream Cheese Icing

Dear dear world,
I write to convey my sincerest and warmest apologies. I know that the internet says that you shouldn't apologize for the neglect of one's blog. But I really really am so remorseful! However, here I am. I am alive. I still have mobile limbs. My kitchen did not blow up in a freak accident. I am not dead yet!

I merely went to school. 
I live in this really great building with 75 other women and NO LEGITIMATE KITCHEN. I mean, we have one. But there isn't a fridge to keep things like butter and eggs and whole cream. And no baking dishes or mixer. You can only bring so many things with you to a dorm room. 


(Yes. I live in a dorm. I'm almost 24 and too stinking poor to live in an apartment. It's a sad story.)  
But there is this really happy ending to the story. :)

Here we go.
Once upon a time there was an average girl who loved to bake (that's me!) She moved out and went to school so that she could be learn all sorts of fascinating things about how to be a great teacher. She got really excited about having her own classroom, creating bulletin boards, even lesson planning. She met all sorts of wonderful people and learned to love them. She stayed up late and laughed. She went to bed early and slept like a rock. Her life was suddenly filled with late night fast food, early mornings, long papers, and many social engagements. But it wasn't all beautiful and good. She didn't have a kitchen. :( She was in despair because of the lack of kitchen in her life. But then she went home on weekends, took over her mother's kitchen, and was happy once more. What's even better (and gives this story a wonderfully happy ending) is now she had an entire floor of college girls to share her baked goods with. One plate of cupcakes was gone in an hour! No more cajoling family members to "Just try one! It doesn't even need to be a frosted one..." just set down a collection of sugar and butter creations and BAM! Gone within a day. It was a lovely existence.


This past weekend's baking adventures? Homemade Gingersnaps with Cream Cheese Icing. And pumpkin muffins, too, but that's another blog post for another day. :)

 
You'll have to forgive the not-so-spectacular photos. I have no access to a proper camera currently and some of them are children of the instagram (blech). But the cookies were stellar. Everyone said they tasted like Christmas...and Christmas tastes like joy, spice, and comfort.

Gingersnaps with Cream Cheese Icing
Cookies:
1/2 cup butter
3/4 cup sugar
1 egg
1/4 cup molasses
1 1/2 cups all purpose flour
pinch of salt
1 1/2 tsp baking soda
1 tsp ginger
1 tsp cinnamon
1/4 tsp cloves
1/4 tsp nutmeg
Icing:
1/4 cup butter
8 oz cream cheese
4 cups powdered sugar
zest and juice of one orange

Preheat your oven to 350 degrees F. In your mixer cream butter and sugar until fluffy. Add the egg and mix thouroughly. Add molasses and mix until well combined. In a separate small bowl, mix dry ingredients with a fork and gradually mix into the butter and sugar mixture, scraping down sides of the bowl as necessary. Chill dough 15 minutes.

 
Scoop onto a cookie sheet in rounded Tablespoon balls. Press lightly with fingers or back of the spoon to flatten. Bake 9-11 minutes until cookies are golden brown. Cool on wire rack before frosting.
Icing:
Cream together butter, cream cheese, and orange zest and juice. Add sugar one cup at a time until smooth. Once cookies are cooled place a generous amount of icing in between cookies creating sandwiches. Store in the refrigerator for the best results. ;) That is, if you leftovers to store.

Monday, August 12, 2013

True Love: White Chocolate Raspberry Cake


The things my parents have done for each other are amazing.
The kinds of hardships they've pushed through to become stronger is astounding.


Their love is the most mind blowing.
And they are just darn cute.


If I am half as awesome as you guys when I've been married 25 years it will be an honor (and probably a miracle...ha!)
Happy Anniversary, Mom and Dad!


I've always thought that chocolate and berries were a good way to celebrate true love.


This cake is small, only 6 inches, which is perfect for the world's best couple and their lucky kids. ;) And it is probably the best white chocolate raspberry concoction you'll ever manage to consume.


White Chocolate Raspberry Layer Cake
Cake: 
3 c. flour
1 TB baking powder
1 tsp salt
12 TB butter
4 eggs
4 tsp vanilla
1 c. buttermilk
2 c. frozen raspberries
Pint of fresh raspberries
Preheat oven to 350 degrees. Whisk flour, baking powder, and salt in a medium bowl. Using a mixer, beat butter and sugar until fluffy. Beat in eggs one at a time. Beat in vanilla. Beat in the dry ingredients with the buttermilk in three additions. Fold in berries. Pour into two greased and floured 6 inch cake pans. Bake 40-45 minutes or until the cake springs back when lightly pressed. Let cool slightly on a wire rack and then turn out onto a plate to fully cool.
Frosting:
8 oz. white chocolate shavings or chips
1/4 c. cream
1/2 c. shortening
1/2. c. butter
2 tsp vanilla
4 c. powdered sugar
Extra cream if needed
Warm the cream in a saucepan until boiling, pour over the white chocolate, stirring until melted. In a mixer beat shortening and butter with the vanilla. Add sugar, beating to combine. The frosting will be dry and crumbly. Add the melted chocolate mixture and beat until smooth. Add extra cream one tablespoon at a time until desired texture is met.
Assemble the cake by spreading a layer of white chocolate frosting over one of the cakes and sprinkle raspberries over the top, crushing them slightly with a knife to bring out juices. Top with the remaining cake layer and frost all over with white chocolate butter cream. Decorate with fresh raspberries.


Monday, August 5, 2013

Nothing Better Than a Garden: Homemade Herb Syrups


Is there any place better than a garden?
I don't know, I think I would be hard pressed to find one. Except maybe a tea house, or a forest, a sledding hill, a big bed full of fresh fluffy pillows, a hammock in the sun, a cliff looking over a sea...
Okay. So an herb garden is one of many perfect places.

 
But really, try and be unhappy when you take a handful of something herb-y and crush it in your fingers. It's impossible.
There is a monstrous bush of mint in the back yard. It really is huge. Gigantor, King of the Mint. There isn't anything that's bigger, unless it's the bush of lemon balm.
A month or so ago my sister and I tied bundles and bundles of the herbs and hung them to dry on racks.

 
11 bundles of lemon balm? What on earth am I going to do with all that lemon balm? 9 bundles of Mint? A person can only drink so much tea before going crazy. (I can't believe I said that. I never thought my limits of tea drinking would be tested. But here we are.)

 
So I brainstormed and eventually set out to make syrup. Syrup is great fun. It smells awesome and you can use it in so many things.
In...
Coffee drinks
Smoothies
Frosting
Mixed Drinks
Cakes
Iced Tea
Plain old Club Soda
((Also, everything always looks prettier in jars. It's a well known fact of life.))


Really, anytime you want to feel homemade and herbaceous you can add it to whatever your eating/drinking at the time and be awesome. You'll feel like Martha Stewart except not creepy and way cooler. (Am I allowed to say that? Because I do think that Martha is creepy and un-cool. I hope that's okay with everybody because c'mon. That fixating glued on smile and even-toned Stepford wife voice thing? Creeps me out. Heebie Jeebie levels off the charts stuff.)

Herb Syrups
3 cups water
3 cups sugar
3 cups of packed dried herbs or spices (mint, lemon balm, lavender, rosemary, cinnamon sticks, whole anise seeds, basil, ginger root, or rose petals)
For lemon balm syrup, you can also add lemon slices or lemon juice, depending on your preference.

 
Also, a drop of green food coloring will make the mint syrup a pretty color if you don't want them all to look too similar.
In a high sided pot bring sugar and water to a boil. Lower heat to low-medium and simmer until the sugar is dissolved and the syrup is clear about 3-5 minutes. Stir constantly! No burning sugar, that's no fun.
Add your herbs (and fruit slices if that's the route you're going. I used four small lemons sliced and one lemon's juice.) and simmer an additional minute.

 
Strain the syrup through a cheesecloth lined sieve and ladle into jars or bottles. You can choose not to line the sieve with cheesecloth, but you'll have a few leafy bits swirling around on the bottom of your jar. They don't harm anything, but if you want to avoid them for presentation purposes, stick with your cloth o' cheese.
Refrigerated, these will keep for 6 months. On the counter it's best not to keep them out for more than a week.

Friday, August 2, 2013

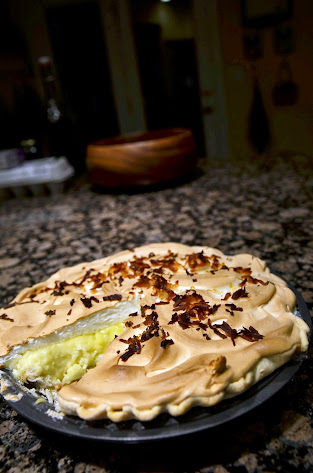
Fruit of the Spirit: Coconut Citrus Meringue Pie

Remember a few days ago when I vaguely promised that there would be more pie before the month of July was up? Yeahhhhh...here's me delivering on that promise.
It was a toss up regarding flavors. It's summer, so something heavy and rich wasn't my favorite choice. Wasn't in the mood for chocolate, but I had made a few fruit pies already this month.
I was really going for strawberry pie, just because I hadn't eaten it in about six years or something, which is an absurd amount of time to go without strawberry pie.
But I had just made mint syrup that I wanted to use so I added Grasshopper Pie to the options. Whoohoo, it was getting better by the minute.
And then I knew that I had two cans of coconut milk in the pantry that had been sitting there forever...and who could say no to creamy coconut?


A Poll was organized, family members and twitter followers were surveyed anddddd. Coconut won out in the end. Go coconut! (It is an astounding nut, I have to say.)
But even in its astounding state, I didn't want to make plain old super delicious coconut cream pie. Depth and dynamic was needed. *hunt around the kitchen ensues* I considered putting the strawberries in, but that might not be the best flavor combo. Raspberries? Better...tart and sweet would be nice.


But then when lemons and limes were found in the bottom of the veggie drawer, I was sold. (I'm always sold when it comes to lemon lime. Citrus is kind like my spirit animal, except it isn't an animal, it's a fruit. So it's my spirit fruit? Fruit of the Spirit? Citrus is love and joy and peace. YES! Wait, no...confused.)
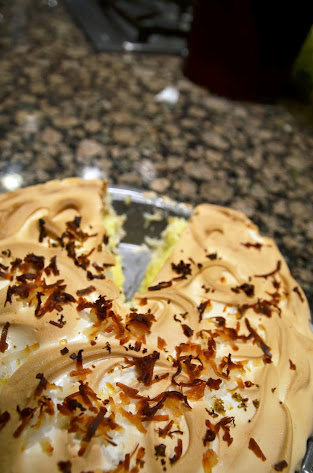
So, zesting and juicing and boiling, whipping, and folding. Hours later I sneak down to the kitchen to eat my appropriately chilled citrus coconut meringue pie and this happened.


I smiled. Someone had taken a slice already. It's good news when your family eats pie in the middle of the night.
So yes, you can practice your fruit of the spirit (mainly self control) while waiting for your pie to chill properly. Or you can just get straight down to "goodness" and slice into it early. No harm done. :D

Coconut Citrus Meringue Pie
Ingredients:
1 pie crust, blind baked
1 1/2 cups coconut milk
1 1/2 cups half-and-half
5 egg yolks
3/4 cup sugar
4 Tablespoons cornstarch
1/4 teaspoon salt
1 1/2 cups flaked coconut
1 1/2 tsp vanilla
Juice and zest from one lemon and one lime
For Meringue:
3 egg whites
1/4 tsp cream of tartar
6 Tablespoon sugar

Instructions:
Pour coconut milk, half-and-half, and lemon and lime juices into a large bowl with the egg yolks. Whisk together until smooth. Add sugar and cornstarch to a saucepan over medium heat. Slowly pour the milk and egg mixture into the pot, whisking as you go. Bring this custard mixture to a boil while whisking. Switch to a wooden spoon and boil one minute, stirring constantly. Remove from heat and stir in vanilla, coconut, and lemon and lime zest. Spread the custard into pie crust. 

For Meringue:
Beat egg whites and cream of tartar on medium speed in a stand mixer until soft peaks form. Gradually beat in sugar one tablespoon at a time on high until stiff glossy peaks form and the sugar is dissolved. Spread over the pie filling, sealing the edges to the crust. Sprinkle the top with flaked coconut and a teaspoon of citrus zest. 
Bake at 350 degrees for 12 minutes or until the meringue is golden. Cool on a wire rack for one hour, and then refrigerate for at least 3 hours before serving. 


Saturday, April 20, 2013

Preppy College Girls and Chicken Nuggets

I have so many recipes backed up that I need to blog. I feel quite neglectful letting them stack one upon each other like forgotten or old magazines you'll never read again but can't really bring yourself to throw away...I promise to treat you better, dear recipes.


Two weeks ago (two weeks, ah! So long ago. So much shame.) I decided to venture out into the land of the unknown. It's become a thing. First ugly food, now deep fried savory things? It's bizarre. I don't even know who I AM any more. Okay. That's very much untrue and I'm being melodramatic because this is supposed to be a baking blog and BAM! I decide to heat a huge pan of oil and decorate my kitchen in little droplets of oil that refuse to be cleaned up without smearing over everything. Hot oil is like college aged preppy girls. (I sincerely apologize to everyone I will most definitely offend in the next few statements) It's loud, can cause drama flames to flare up very easily, and generally gets its issues all over everything and everyone within a certain vicinity. But you think it's your friend! So you try and clean up the mess and avoid more mess. Nope. It's impossible. Also, if there are any college aged jock dudes around, it's not too far behind.


Hot oil = preppy college girls.
Okay, I am being too harsh on my peers here. But there was a whole gaggle of them in the Student Union Building yesterday and they were singing Kesha out loud in the study area like they were God's musical gift to mankind. Break it down, shall we?
Study Area
People Trying to Study
Said people appreciating the quiet atmosphere to study in
Preppy girls in yoga pants/weird bun things on their heads singing Kesha
Off key
Oh. Sorry, that's Ke$ha...m'bad.
Candice has the urge to fry aforementioned yoga pants girls in very hot oil so they shut up.

AH! If you ever have an experience like this and you need something to ease your rage...you can go home and make homemade chicken nuggets and eat them all. Not saying I ate them all or anything. But if I did...I totally have an excuse and it is legitimate, I swear.


A while ago I saw some disgusting chicken nugget video about the process that chicken nuggets come to be. And I was all "EW! How awful! What is the world coming to? This is despicable and I refuse to ever purchase another chicken nugget!" and then maybe a week later I ordered like, 17 hundred chicken nuggets from McDonalds. Go me. My mom (eating a salad of course) made some comment to me as I munched those crispy little death morsels..."Weren't you just talking about that pink slime stuff the other day? The stuff that's in those? How do you eat it? Do you just distance yourself?"
Thanks mom. Calling me out and shaming me for my nugget addiction...the woman is wily, I tell you. I need to learn her crafty ways. Well! Lo and Behold!! Homemade nuggets. Tasty nuggets. Nuggets o' awesome.

Recipe for Nuggets O' Awesome:
4 chicken breasts cut to bite size pieces
1 cup of marinade*
2 1/2 cups flour
1/4 cup powdered sugar
4 tsp salt
1 tsp white pepper
1 tsp paprika
1/2 tsp celery seed
1 tsp onion powder
2 eggs
1/2 cup milk
Oil for frying
*I used 1 cup of dill pickle juice, but the chicken had a very pickley taste after frying. I thought that was awesome. But if you don't really like dill pickles, try using half a cup of pickle juice and something else to compliment it. I plan on using mild fruit juices or coke. (anyone ever had Coco cola chicken? Amazing.)
Marinate your chicken pieces in the marinade for at least four hours and up to 24 hours. Heat oil to 375 F in a large high sided skillet. In a small bowl whisk together the eggs and milk. Throw together all the dry ingredients into a gallon sized ziploc bag and shake it up to combine. Take your nuggets and dip them in in the eggy mixture, then throw them in the bag. Go to town shaking it...shake some more. Then shake off the excess from the chicken pieces and lay then in the hot oil to fry. Fry three or four at a time, don't let the oil get too hot or else they will burn. Fry about two to three minutes on each side and then drain them on layers of paper towels. 
Eat them as soon as you can without burning your fingers or the roof of your mouth. Because nothing quite ruins the eating experience when you have that burnt feeling on the roof of your mouth. 

Saturday, April 13, 2013

Signs of Spring and Orange Pistachio Cupcakes

People.
Tulips are here. So are forget-me-nots. Also...the sun stays up til eight o'clock.
This means SPRING!
Okay, so it is still raining cold, hard, ugly rain and venturing outside usually means misery, but it's coming. There are signs. I love the signs.

So today being a Saturday completely to myself (my family is out of town) with zero obligations to the outside world I decided to wake up at 7 o clock in the morning and be HAPPY and PRODUCTIVE. (See  how those things are in caps? That means stuff just got real.) Do you know how much more time you have when you wake up at 7 instead of at ten? It's crazy...

So. What does HAPPY mean in my personal dictionary? It means making cupcakes. And cupcakes can kind of be productive, right? (I did three loads of laundry and cleaned all the bathrooms just to make sure I covered the PRODUCTIVE aspect of the morning. You know, just in case. I wanted there to be no doubts regarding the matter.)

Enter:
Happy Productive Signs of Spring Cupcakes;
Mandarin Orange and Pistachio Almond Cupcakes
So that's a long name. I'm sorry, you'll have to deal with it because all those words are important for everyone to understand how awesome these cupcakes are.
Fluffy almond cake: check


Juicy bits of mandarin oranges: check

Crunchy pistachios: check


Lightly sweet almond buttercream and cute springtime topping of orange segments and pistachios: check


Happiness and productivity: check


Now, decorating these cuties proved a challenge. I started with green tinted frosting. Because pistachio cupcakes=green. Understandable.


But it didn't look quite right. So I added orange tinted frosting to the equation. Better....But then I tried frosting them with just the plain white un-tinted frosting. I liked the way those ones looked best.


What can I say? I like simplicity. And it seems classier that way. But of course, when you make these yourself (You will be making these, right? RIGHT? Ok, good.) you can decorate them however you please. You can even skip all the trial and error of frosting tinting since I got that out of the way for you.


Mandarin Orange and Pistachio Almond Cupcakes (Makes 12)
1 1/2 cups flour
1/2 Tablespoon baking powder
1/2 tsp salt
6 Tablespoons unsalted butter
3/4 cup sugar
2 eggs
1 tsp vanilla
1/2 tsp almond extract
1/4 c. buttermilk
2 cans mandarin oranges, with syrup
1/2 cup shelled and chopped pistachios
Preheat your oven to 350 F and line a muffin tin with cupcake liners. Whisk together flour, baking powder, and salt in medium bowl. Set aside. Open the cans of mandarin oranges and measure 1/4 of the syrup in to a small bowl. Add 1/4 cup of buttermilk to this syrup, set aside. Using mixer, cream butter and sugar until fluffy. Beat in eggs one at a time. Beat in vanilla and almond extract. Beat in the dry ingredients and milk/syrup mixture in 3 additions to the batter. Chop orange segments roughly to measure 1/2 cup. Fold with pistachios into the batter. 
Measure the batter into the muffin cups, filling 3/4 of the way full. Bake 20-25 minutes or until the tops spring back when lightly pressed. Let cool completely before frosting. Top with additional chopped pistachios and remaining mandarin orange segments.


Almond Buttercream Frosting:
1 lb powdered sugar
1/2 cup milk
1/4 tsp vanilla
1/4 tsp almond extract
1 stick of softened butter, cut into cubes
1/2 cup shortening
Whisk together sugar, vanilla, almond, and milk in stand mixer. Add butter one slice at a time, beating until incorporated. Add shortening and whip about 8 minutes until double. 


Saturday, March 9, 2013

Cider House Rules: Apple Cinnamon Rolls

Sometimes when I have wayyyy too much homework to do and my bathroom definitely needs scrubbing and I haven't done laundry in a week. And I should catch up on all the sleep I've lost in the past few nights. Sometimes when these things are hanging about bothering me I do a very childish and inappropriate thing.
I set my chin determinedly, my eyes squint just slightly slightly (a 100th of a centimeter) closed in that steely look that cowboys get in those western movies when they see their nemesis across the street. (you know what I'm talking about, yes? Yes.) I stubbornly ignore all those things that I should be dealing with. And I open up Netflix.

Netflix is a bad thing for young women who fancy themselves worthy of a movie night.
Oy vey.
Now, I am not saying that when you have a million and three things to get done you should drop them all willy nilly and watch obscure movies on the internet. I am not.
But you can come across some great cinematic enjoyment in it. ;)


Like movies about orphanages and apple orchards. (OH MY GOSH. It's perfect.) When I was a kid I wanted to be one of two things...or maybe both things at once, I couldn't decide. Anyway, when people asked me what I wanted to be when I grew up I answered either with "Owner of an apple farm" or "Head Teacher of an orphanage" So a movie where half the story takes place in a New England Orphanage and the other half follows the lives of apple pickers in Maine? Pop the corn, amigos. I'm watching it no matter what.
Enter Cider House Rules. Watching this flick made me think of apples. And also of all the imaginary children I would be able to bake for if I ran an orphanage. I liked Cider House Rules.
I also like Apple Cinnamon Rolls.


Now, everyone has a good cinnamon roll recipe. Two people in one day, upon learning I was making cinnamon rolls offered to give me theirs. Everybody thinks theirs is the best breakfast bun, and I am not here to change your mind.
Except I kinda am. Going to change your mind. (ha! See what I did there? Yeah.)


Next time you make your cinnamon rolls, put in an apple. Nothing drastic...just apples.
Just AWESOME-ness.

Apple filling for your cinnamon rolls"
1 Apple, peeled and chopped finely
1/4 c. butter
1/4 c. sugar

Ready for the life changing directions? Eyah.
Melt butter in a sauce pan. Put the apples in the sauce pan. Sprinkle the sugar on the apples. Cook down the apples in the butter and sugar until they are soft. There will be all sorts of bubbly butter-sugar-juice, so drain the apples, reserving the liquid. Brush your rolled out dough with this liquid and sprinkle generally with your cinnamon sugar mixture you usually put in your cinnamon rolls. Then add the softened apples to the rolls. Roll up tightly and slice. Bake like you normally would and enjoy the AWESOME-ness.


Saturday, March 2, 2013

Happy Birthday Dr. Seuss!

Dr. Seuss is one of those people that made my life better. And I can't really pinpoint it, but I love him and his crazy head. The nonsense he created has got to be some of the best nonsense I've ever read.


Look at him! It's like the face of genius and fun all wrapped up in one. I have seriously considered creating a Dr. Seuss board on pinterest. But I have wayyyy too many pinterest boards already. I mean, what is one to do when there are things like this floating around the internet?


Exactly. 
I'm not sure what flavor of cupcakes Dr. Seuss would want for his birthday. But I do know what a lot of kids like, and Dr. Seuss is the un-official patron saint of children. 
When I was a kid one of my favorite things to eat for lunch was Peanut Butter and Honey sandwiches. There was something special about them. Not your regular old pb and j fare, my friends. This was PB and awesome. 
And so: 
Peanut Honey Cupcakes.


If you ever loved peanut butter and honey sandwiches, you must make and eat these immediately. Just don't eat three at once and get sick like everyone else in my family. :/ That was a bit awkward. 

It will be hard. You will want to eat three. You will have to reach deep within you to find that self control that  every cupcake ninja possesses. 


Honey and Peanut Cupcakes- Makes about 13 (I know, weird number. Sorry.)
  • 1/2 cup sugar
  • 1 3/4 cups flour
  • 1/2 teaspoon baking powder
  • 1/2 teaspoon baking soda
  • 1/4 teaspoon salt
  • 1/2 cup honey
  • 1/2 cup soft butter
  • 2 eggs
  • 1/3 cup sour cream
  • 1/2 teaspoon vanilla
  • 2 cups chopped unsalted peanuts
In a bowl whisk together flour, baking powder, baking soda, and salt. In a mixer cream butter and sugar until fluffy, about three minutes. Add eggs and vanilla, beating well and scraping down the sides of the bowl after each addition. In a measuring cup or small bowl, whisk together the honey and sour cream until smooth. Add to the batter alternately with the flour mixture, beating after each addition until all the ingredients are combined. Fold in the nuts. Fill cupcake tins 3/4 of the way full and bake at 350 until the tops of the cakes spring back when pressed or a toothpick inserted in the middle comes out clean. About 18 minutes.

Frost with peanut butter, honey, cinnamon, or vanilla butter cream. You could try cream cheese frosting too because cream cheese frosting is my spirit animal icing.
And so I leave you with words of wisdom from Dr. Seuss himself...(I love this list. I want it for my future classroom. :D)

Sunday, February 10, 2013

Why Coffee is Good in Cookies


It has already been established that Valentine’s Day is awesome.
There is no room for debate on this issue because I unfairly justly implemented cupcakes into my argument. 
Yes. That means I win.
Do you know what else wins? Coffee-Chocolate flavored things. I think this flavor combination is called “Mocha”, but since I am not a coffee drinker I am really not an expert on the subject.
Okay, we are taking a detour here because everyone just went “WAHTTT? You don’t like coffee? Aren’t you a college student living in Seattle? You’re crazy. Coffee is so amazing. It keeps you awake and it tastes good. I love coffee! How can you not like coffee? Coffee…” I don’t like coffee. It tastes like burnt water. Yes, even the so called “good” coffee. It’s gross. I drink it maybe once a month when I am on the verge of physically harming myself because I am so tired and I need caffeine. Usually a cup of tea is enough caffeine for me, (okay, detour within a detour: TEA is amazing. Like the polar opposite of coffee. Okay, back to detour one…) but sometimes when I only have two hours of sleep behind me and I have no hope of getting to bed before 1 or 2 am I have to resort to the evil of coffee to get me through. Ugh.
There. Detour over. We are back to happy things like Valentine’s Day and cookies.
Cookies! Chocolate Coffee cookies to be exact. I usually don’t decorate cookies with Royal icing for two reasons. Reason one is that it takes foreverrrrrr. For. Ev. Er. I could probably get faster if I did it more often and practiced. But I don’t because it takes forever. As aforementioned. But really, it took me about five hours to make thirty cookies start to finish. That’s a lot of hours, amigos.
Reason number two: it just doesn't taste as good as it looks.  And while I like things to look pretty, I like them to taste good more. (That was a terrible sentence grammatically speaking. But it’s okay, this blog is a judge free zone.) Royal icing is so super sweet with no flavor other than just: SUGAR OVERLOAD FLAVOR!! But the chocolate coffee cookies are so intensely dark tasting that a sugar crust to go with it is perfect. It is pretty hard to find a fault with pretty cookies that taste good. :D
And they are perfect for Valentine’s Day! 
  • Chocolate Coffee Cutout Cookies
  • 3/4 cup sugar
  • 1 cup  butter, softened
  • 1 teaspoon baking powder
  • 1 teaspoon vanilla 
  • 1 Tablespoon instant coffee granules
  • 1/2 teaspoon salt*
  • 1 large egg
  • 1/2 cup  cocoa
  • 2 1/4 cups flour
  • Beat together the sugar, butter, baking powder, vanilla, espresso powder, and salt until fluffy.  Beat in the egg. Scrape the bottom and sides of the bowl again.Whisk together the cocoa and flour, then beat into the egg and butter mixture until well blended. Refrigerate the dough for 30 minutes, or up to overnight. Preheat your oven to 375°F. Lightly grease baking sheets. Divide the dough in half. Sprinkle both sides of each piece with extra flour, to keep the dough from sticking. Working with one piece of dough at a time, roll 1/4 in thick. Cut into heart shapes with a cookie cutter. Place the cookies on the prepared baking sheets and bake for 8 to 10 minutes, until their edges are firm and you start to smell chocolate/coffee wafting through your flour covered kitchen. Allow to cool completely before decorating with icing of your choice.